Transactions
Transactions are the heart of the Point of Sale area of Masterpiece.
Transactions include Sales, Sales Returns, Approvals, and Leases.
Topics in this section also include:
Editing an Existing Sale, Edit Client, Edit Payments
The transaction screen is divided into areas
that represent its separate parts:
-
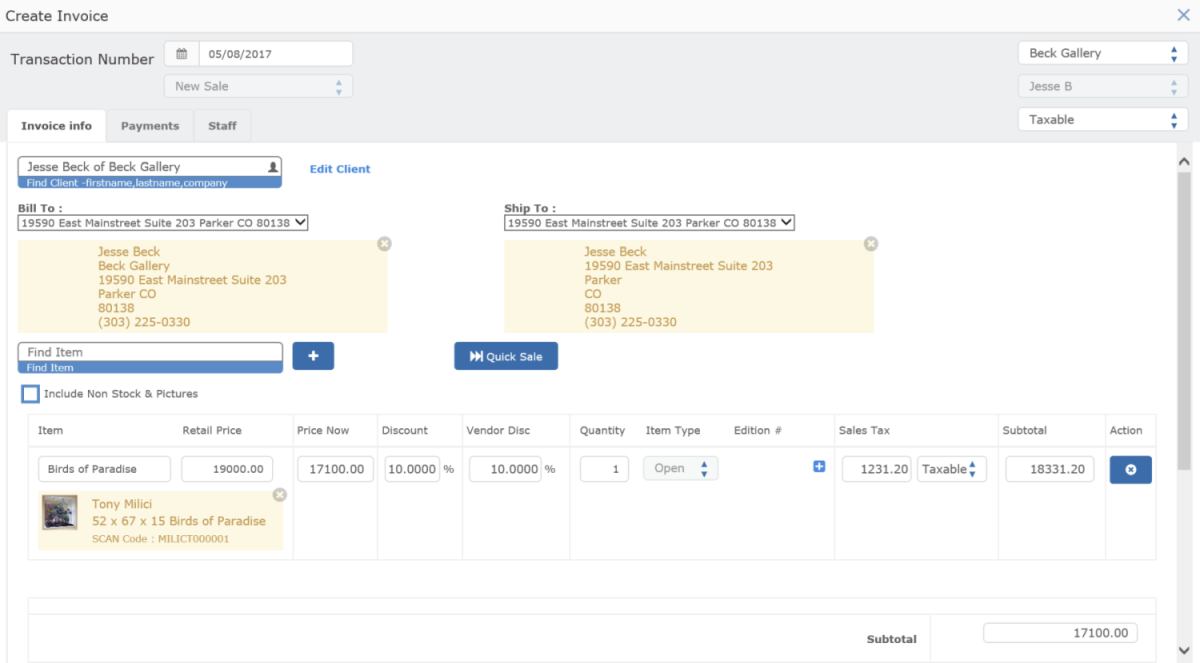
The top portion contains "header" information like sales date, transactions #, Transactions Type, Company Location, Staff Name and Tax Info.
-
The Invoice Info tab contains "item detail" information and client information as well as mailing and shipping information. Notes fields have been added to the bottom for Shipping, Contact and Transaction notes. The Contact notes automatically carry over to the notes field on the contact record.
The Payments tab records payment information and allows you to schedule several payments via layaway or installments.
The Staff tab records who performed the sale. It defaults to whoever is logged into the profile but can be changed by clicking on staff name and using drop down. This is also the place to record staff commission. Staff commission can be set to one staff or divided among several staff.
Transaction Numbers:
By default, the next Transaction Number will be automatically generated by the system. Transaction numbers can be edited by clicking on the green pencil icon for leases, new returns, quotes and approvals. Numbers have to be unique or else a message will appear saying that it is not unique. Once a transaction number is edited, it then becomes the max number used and every transaction thereafter will be +1 from the max number. This includes approvals, quotes, leases and sales. The trans number field is alphanumeric. However, if you put in a letter, the program will only generate numbers.
Other Transaction Fields:
The Client Name field will stay blank until you enter the client information the client field. If the client already exists, you can type the first few letters of the first or last name and select from the drop down. The contact info (such as address, phone number, email, etc. will automatically fill in. It is not necessary to have a contact name. The grey Transaction Type field below the date indicates whether this transaction is a Sale, Approval, Return or Lease.
By default, the system will enter the Current Date. It will also default to a Local Sale, for the primary gallery location, and will enter the operator name for whoever is logged in at the time. These fields can all be changed during the transaction.
Item Entry (Detail Lines):
The Tax Type will default to whatever your default tax type is. The program will look at system default tax type first and if none is found, it will look at staff default tax type (which is also useful for multiple locations)
Although you can skip the client info completely, you will want to capture client details for most transactions.
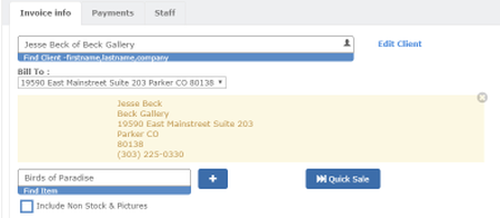
Use the mouse to click in the Find Client field.
Here you will enter the Client information, and the Shipping and Mailing phone and address information. You can either select an existing Client by typing in a few letters of first or last name in the "Client Name" field or enter a new Client by simply filling out the fields.
Transactions follow the below logic when adding or editing contacts on a new sale:
- New transactions
- if existing Contact Record = true
- Pull billing and shipping details from Contact Record
- If billing and shipping is edited after pulling in, message will ask if you want to update transaction only or the contact record
- if existing Contact Record = false (new contact created)
- Post billing and shipping details to new Contact Record when first saved
- Post billing and shipping details to Sales Transaction details
- Editing existing transaction
- If yes to message then it will save contact details only to Sales Transaction details
- If Cancel is pressed in message, then it will not Contact Record
- Editing existing Contact Record
- Save changes ONLY to Contact Record
- Will not update Sales Transactions details
Please refer to the Contact screen documentation for help on setting Phone and Address types, and setting the "Main" Phone or Address.
Entering a New Client:
To enter a brand new client, leave the Client Name field blank (or delete what's in it) and tab off. The remaining fields will go blank, and you can enter the new client.
Address and Phone information:
NOTE: There is no need to enter the same information in both the Mailing and Shipping areas. If the shipping address is the same as the mailing address, leave the shipping address blank. If you do enter a shipping address, you will be creating two separate address records for the client, with the same information.
Look up the Title:
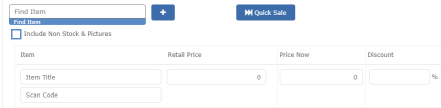
Start by typing in a few letters of title, scan code, artist or subject in the "Find Item" field. You can choose which fields the title searches by in Company Settings --> Transaction Settings. A dropdown will appear where you will select the item you wish to sell. If the item is a NON STOCK item OR you want to see images, click on the box that says "Include Non Stock & Pictures" box first.
Tip: If the piece you wish to sell is NOT already in your inventory, you have the option of using the Quick Sale feature, which is described in more detail below.
After you have selected the item to sell, all the information about the item will automatically file in. Such as the title, price, item type and scan code.
Next steps are to add any applicable discounts, QTY (if the item is an OPEN item type), Edition number (if the item is a limited edition) and any attributes.
-
Unique and Opens: You will be unable to change the Quantity field. If the item is unique, the default will always be 1.
Limited Edition pieces:
If you are selling an Limited edition piece, you will want to indicate which edition you are selling. If the actual edition number is not in your system, you can use the Quick Sale check box from this screen to add a new item to this edition. The Quick Sale button on this form is discussed in the Over Quantity section below. If you do not know the edition number you are selling, put in edition #0. When you find out the edition number, you can go to the item record and update the edition # to the actual edition it is supposed to be.
More info on Quantity.
You should only change the Quantity if you're working with an Open Edition; by definition there is only 1 of a Unique, and Masterpiece tracks Limiteds individually in the Transaction screen, edition drop down, so you can only have 1 per line. If you have selected an Open Edition and enter a number larger than the Quantity Available for the Lot that you've chosen, the remainder will become an Over Quantity item lot.
Enter the Price Now otherwise know as the Sales Discount:
At this time the form has auto-entered the Price Now, scan code and title. You can adjust the Price Now by either entering a Sales Discount percentage in the Sales Adj% field or entering a new Price Now.
Changing either of these fields will automatically change the other: I.E. if you have a Price Was of $100.00 and enter a 10% Sales Discount, the Price Now will change to $90.00. Then if you enter $85.00 into Price Now, the Sales Discount will change to 15%. Price Was is used as the basis for these calculations and should not be changed from this screen.

Vendor Discount:
The Vendor Discount field is used for adjusting Consignment Due to the Vendor, in the case of a consigned item. If you give the customer a discount you have the option of eating all of that discount, and the vendor gets the full amount of his consignment or you can have the vendor share in that discount. If you would like the vendor to share in that discount, you will have to put in the amount in the SalesAdj AND the VendDisc field.
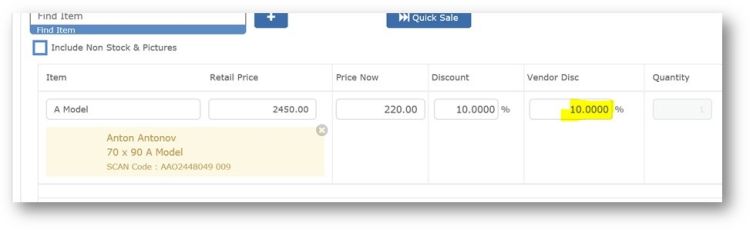
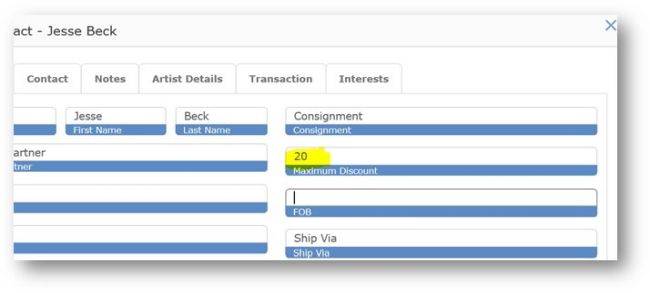
Please note that you should not enter a Vendor Discount that is greater than the Max Discount of the Vendor on the Contact form!
Line Item Tax:
The line item tax is meant to be for very special cases and you will want to leave as is most of the time. It is used for assigning a different tax rate to one item in the transaction. For example, if you sold 5 different items and they all had a LOCAL tax that was applied to it, except one item was supposed to have NO TAX. This is a way to do that without making a whole new transaction.
Again - For most situations, you can simply change the tax type of the whole transaction from the dropdown in the top right
Remove:
Use this button to remove a line from the Item Entry Grid. Once an item has been saved to a transaction, it cannot be removed unless you delete the whole transaction. You can ADD items to a saved transaction, just not delete.
The Quick Sale feature was designed to allow you to enter an item for sale "on the fly" when your client is standing at the cash register and you have not yet entered the piece in the system. If the client is not present, it is generally better to add the item to inventory, and then come to the transaction screen to complete the sale.
When you use the Quick Sale feature, the system captures the bare minimum amount of information to create an item for sale. The idea is to process the sale as quickly as possible so that your client does not have to wait. It is up to you to return to the item, after the transaction has been completed, to "fill in the blanks."
For example, when using a quick sale, we do not capture any dimension, artist, vendor or cost details.
There are two types of Quick Sales:
New Item Only - [Title already in system]
In the case of a Limited or Open edition, you may be selling another piece from the edition, even though it is not in your inventory at present.
Begin by check the "Quick Sale" check box and then enter the title and select from the drop down.
When you use this feature, Masterpiece will immediately add this edition to your title as a SOLD edition.
Brand New Title
If you are selling a brand new piece (by this we mean that you have never sold an item with this title before) the system will need to add several additional pieces of information before it can be sold.
Click on the Quick Sale check box. Masterpiece will immediately create an empty Title, and Purchase records. It will generate a ScanCode (without an Artist Code that starts with N/A) and allow you to enter the remaining detail on the detail line.
The steps for entering the detail are the same as for a normal detail line with one exception: you must choose the Edition Type. The default Edition Type is Unique. The Ed Type column has a drop-down list with the edition types, and you can use this drop down to make a selection. If you select Limited, you will be required to enter the Ed Size and the Edition number for this piece.
NOTE: You will want to enter SOME edition number even if you don't know at the time which edition number will ultimately be supplied to the client. Most of the time it will be edition #0. Once you receive the actual piece that will be shipped to the client, you will need to set the edition number for the piece to the actual number.
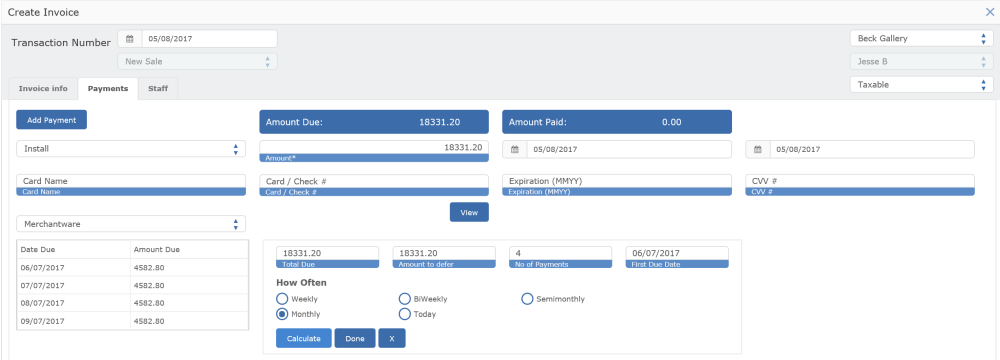
When you go to the Payments tab it will be blank and ready for you to start recording how you were paid.
Payment lines can include Layaway and Installment lines that have not been paid, so long as the total Amount Due matches the Sales Total. When a payment is made, the Amount Paid must match the Amount Due for all lines that are not Layaway or Installment.
Regular payments (Cash, Cheque, various credit cards, Gift, or the various Other):
Change the Pay Type to the desired type using the Pay Type drop down.
If necessary, change the Date Due and the Date Paid. Please note that the Date Paid for regular payments defaults to the Transaction Date. Fill in the rest of the columns as needed for check or credit card transactions.
Layaway and Installment payments are treated exactly the same way (accounting wise) within Masterpiece. The two pay types are provided so that you can distinguish between transactions where the client has accepted the art, and where they haven't.
If you make the pay type Layaway or Installment Masterpiece will present you with the Payment Calculator form. This form helps you calculate time payments.
When the form first opens the Amount to Defer will be the amount that was in the Amount Paid column. You can change this amount if you wish.
Choose the number of payments and the How Often value. When you choose the How Often value, the First Due Date changes to the Date Due plus the time period you are choosing. The First Due Date is a DateLookup field, so you can change this date if you wish.
After you have selected your settings, click on Calculate. The payments will be calculated and displayed in the grid. You can change the Date Due and the Amount Due on the grid if you wish.
When you are happy with the results, click on Done. If you are going to just have one whole amount on Layaway or Install, you will still want to hit CALCULATE and then DONE.
Masterpiece makes the final payment an odd amount if the Number of payments does not divide the Amount to defer evenly. Remember, you can always adjust the calculated payments in the grid.
If you have Calculated and/or pressed Done, then the Payment Calculator form will disappear, and Masterpiece will insert the payments lines into the Payments grid.
One special application of Installments would be a single payment in the future. To do this just make the Number of Payments 1, and make the Due Date the future date. This will create a single Installment payment.
Later on you can edit the Sale to add payments when the client brings in payments.
The final step in saving a transaction, is to press the Save or Save And Close button. When you save the sale, Masterpiece validates the information you entered. It will:
Make sure that the Transaction Number has not been used for another Transaction
Require that you enter an Edition Number for a Limited Edition piece
Make sure that you actually entered some items
Make sure that a valid Tax Type is used
Make sure that you change the Pay Type if you entered an Amount Paid on a Layaway or Installment
Make sure the Date Paid is not empty if you have entered an Amount Paid (i.e. paying on Layaway or Installment)
If you have entered too many payments, tells you to enter change (give the client change back) or a credit. Adds a payment record.
Other things that happen at save time:
The Paid In Full date is updated if all the monies have been received.
Masterpiece marks the Contact record for the Client to show that they are a Customer and adds the name to the contact database if they don't already exist.
Location Change records are added to track the movement of the piece:
If a new lot is created, the original Lot gets a Location Change record in the stock location tab.
If there is a Vendor Discount, and the item is on consignment, the discount is recorded in the Purchase Payments file. This is described more fully in the Consignments help screen.
The total quantity on hand for the Title is adjusted by the quantity sold.
For Limiteds, the Edition(s) sold are marked as sold in the Item Editions table. This affects the Items Form --> Editions tab.
If the Item sold is involved in your integrated Web Site then the Title and Item information is set to be automatically updated during the next Web Update.
To edit a sale, use the grid to find the transaction. Check the box next to the transaction and click on edit button or double click anywhere on the line item.
NOTE: YOU CAN ONLY CHANGE THE TRANSACTION NUMBER ONCE THE TRANSACTION IS SAVED.
On the main form you can change the following:
Transaction Date
Tax Type. Please be aware that this can change the Sale total, and require adjustment to Payments.
Location
Staff
Add Items
To change the client for this transaction, simply type in first letters of first or last name in client name field.
This allows you to select an existing client as described above in Enter Client.
You can edit or delete any of the payments. This includes changing due dates, amount due, pay type, credit card information.
One of the main reasons for editing payments is to enter payments on Layaway or Installment. To do this, go to the line you wish to record payment in. Change the Pay Type to something other than Layaway or Installment.
Enter the Amount Paid, which can be the Amount Due or less than the Amount Due. You can also change the Date Paid. Fill in the credit card/check information as required by your business rules.
If you are entering an amount that is MORE than the amount due, you will need to delete payment lines and add a new one with the correct amount.
When you record an Amount Paid that is less than the Amount Due on Layaways or Installments, a new Payment record is created with the balance for that payment, keeping the Date Due from the original Payment record. This record appears at the bottom of the grid, and you may not see it if you have many payments. When you save the Sale, the payment records will be resorted by Date Due.
Some States have mandated that companies have consecutive invoice numbers. While the legal responsibility is on you, we do allow for deleting of transactions. You can set staff user permissions to prevent sale deletions if needed.
Enter a Sales Return when your client returns an item.
New Return
The first step in returning a piece is to locate the original transaction. Masterpiece will use the information from the transaction to determine the prices, client, and payments.
On the transaction grid, select the transaction to be returned and check the box to the left and then press the return button in the top right.
Masterpiece then opens the Transaction Form in Add Mode and sets the Transaction Type to Return. The read-only fields on the form will be brick red: this color indicates Sales Returns on the Transaction Form and in the Find Transaction Form.
Returns Form
After the return form opens, you can change the Date, Tax Type, Transaction Location and Staff.
Item Entry
The form will display the item from the original transaction or ALL the items if you are returning multiple items.
The most important thing to do here is to enter the Qty Ret'd and press the R button to the right of each line item.
Note that this value defaults to 0! As you enter the Qty Ret'd notice that the Totals field values change. Note that dollar amounts on a return are negative, but the Qty Ret'd is positive. Also note that the only column you can edit in the Item Entry is Qty Ret'd as it doesn't make sense to change the Title or the Price Now (selling price) of the Item. You cannot enter a Qty Ret'd that is greater than the Quantity Sold.
Clients
The Client information defaults to the original Client. You can leave this Client, select an existing client, or click on New Client as described above.
Payments
The biggest difference between the Sale and the Sales Return versions of the Transaction Form is the Payments page.
The valid pay types for a return are the credit card types, Cash, Credit and Cancel.
SPECIAL CASE - LAYAWAYS
If the customer has not fully paid for the piece being returned, then obviously, you will not want to issue a credit (or hand them cash) for the full amount of the sale.
If the customer has paid less than the full amount, you would only issue a credit (or cash, visa, etc.) for the actual amount paid. You would then add a payment (in the top grid) and set the payment type to CANCEL to indicate that the reason the rest is not being returned on this return, is that the payments are going to be cancelled.
Saving a Return
Several things happen when you save a Return:
The Item and Title Quantities are increased
The Stock Location is set back to the original Stock Location
Location Change records are created
If the item was on consignment, reversing records for any Vendor Discount are created in Purchase Payments
If the quantity returned is the same as the quantity sold: