Tax Type
How to add tax types
Things to keep in mind regarding taxes: When you first setup your taxes it is best to re-name and utilize the existing taxes that have never been used that are already in the system. As once a tax is created you typically cannot delete it. Also keep in mind that when it comes time for a tax rate to change you will keep all your current taxes that you have setup so you have tax history and you will add an additional Tax Detail and then activate it in the Tax Types with a new Tax Type. You will keep all your existing Tax Details and Types and make the new one the default typically.
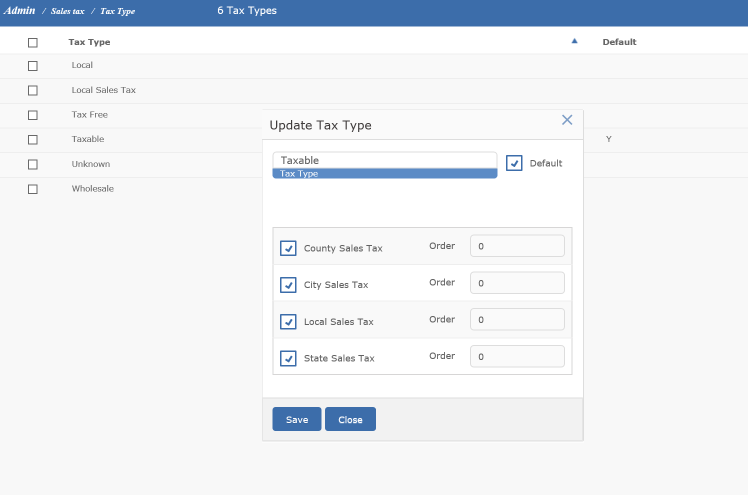
The Tax Types is where you will link all of the tax details together into one rate. Go to ADMIN and then double click on TAX TYPES and either open a default tax type or click on ADD to add a new tax type.

Create a list of "tax types." Enter the display names of applicable tax rates (e.g., "Local Tax" or "Out of State"). Each tax type contains a list of all tax details which apply and by checking the boxes are activated. For instance, for "Local Tax" created for a gallery in Denver, the user could specify that "State Sales Tax," "Denver City Sales Tax," "RTD Sales Tax," and "Stadium District Sales Tax" details all apply to the "Local Tax" type or "Taxable" as shown in screen shot above. For each tax type shown in the list on the left, check all the tax details on the list on the right which apply. The above example shows that for a sale with a tax type of "Taxable," four different sales taxes are collected. The sales tax shown on the transaction screen is a sum of all taxes collected.
The reason you should only create one Tax Authority and one Tax Detail for each Tax Liability is because Masterpiece calculates each Tax Detail separately. So if you pay the State a City Tax of 5% and a County Tax of 1% and create separate Taxes then Masterpiece will calculate those taxes separately and because of rounding you will be charging your customers too much Tax.
